Going with your bicycle isn't really as a very remarkable faff as a great many people think. However long you have the fundamentals down, the most risky part is really hauling the bicycle to the station or air terminal. Other than that, the coordinations aren't hard in any way. Here are some simple strides to follow next time you're going with your bicycle.
1. How would I book my bicycle on a train or plane?
Regardless of whether you're flying or taking the train, it's in every case great to book your bicycle installed already. Some train organizations and carriers charge extra for bicycle sacks and it's consistently less expensive to pay before heading off to the station or air terminal. In any case, on the off chance that you do overlook, it's not the apocalypse. Air terminal staff can generally sift through something.
Simply call up the organization and state that you're going with a bicycle for a situation. The sum you'll be charged can shift from anyplace between complimentary to around €100, contingent upon the organization.
2. Twofold check as far as possible
It is critical to check what as far as possible is for your bicycle, before you travel. In case you're passing via train there's clearly no weight breaking point to stress over, however when you're flying it typically changes somewhere in the range of 23kg and 32kg – for the most part the lower end of the scale we would say. It's essential to check before you begin pressing your bicycle so as to realize whether to pack it in a sack or box.
3. What do I pack my bicycle in?
Aircrafts and (most) train organizations necessitate that your bicycle is stuffed into some sort of a case. There are two alternatives – a bicycle pack or a bicycle box. Which one you pick relies upon a couple of various things.
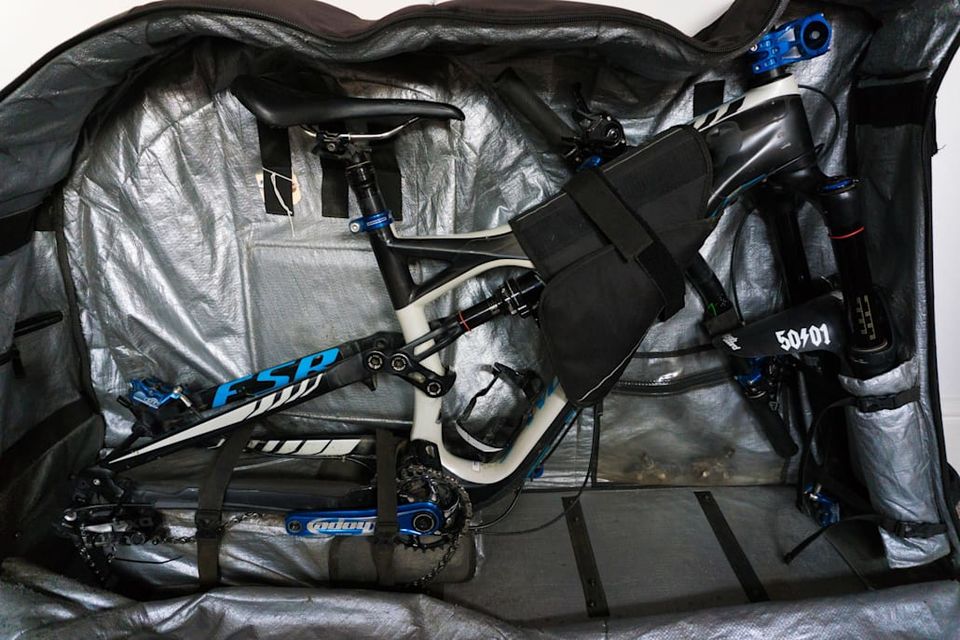
Bicycle sack: Traveling with a bicycle sack is simpler as it's snappier to pack the bicycle into the sack and it's likewise very much ensured and simple to wheel around. On the drawback, packs are heavier than a container and you need to purchase, enlist or obtain one. In the event that you plan on voyaging a ton with your bicycle in any case, purchasing a bicycle sack is justified, despite all the trouble.
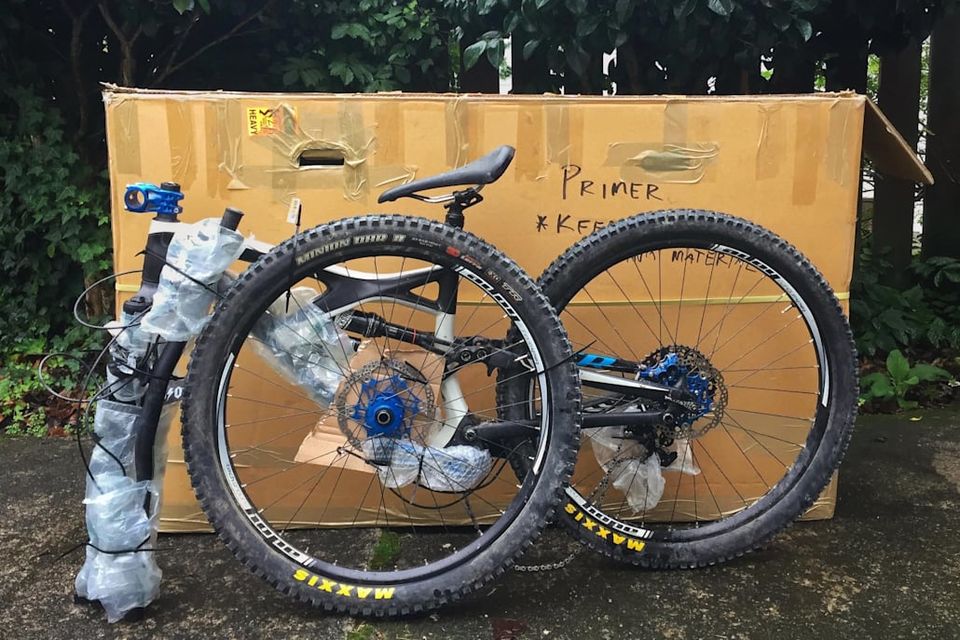
Bicycle box: Traveling with a bicycle box is somewhat more troublesome as it takes more time to pack appropriately and it doesn't accompany wheels, similar to bicycle sacks do, making it harder to convey with you. In any case, it is significantly less expensive to get one (most bicycle shops part with or sell boxes for a little charge) and it spares a ton of weight. On the off chance that weight is an issue with the carrier, it merits going for the bicycle box.
4. How would I pack my bicycle in a sack?
It doesn't take long to pack your bicycle in a bicycle sack since it's now ready for you: there's insurance for your forks, BB, derailleur, haggles to secure it all in securely. When you've done it a couple of times, it shouldn't take over 15 minutes. Here's the means to follow:
Pedals: Take them off and put them in a pack or a case.
Wheels: Remove the two haggles them into their distributed openings. Put a bit of cardboard or brake blocks between the brake cushions front and back on the off chance that your brake switches unintentionally get pushed in during travel. On the off chance that you want to be extra cautious, eliminate your brake plates from the wheels also.
Derailleur: Take it off and zip-attach it to the back triangle of the edge to secure it.
Handlebars: Remove and go them aside. You can do this either by removing the entire stem and handlebar mix or basically unscrewing the stem's front plate, which holds the handlebars set up.
Bicycle clinched: Put the bicycle into the sack and lash it in safely utilizing the ties with the goal that the bicycle remains set up. There's ordinarily a defender for the edge that holds the handlebars set up too.
5. How would I pack my bicycle in a container?
It takes somewhat longer to pack your bicycle in a case, as there's no pre-made defensive bundling or lashes. A decent tip is to make sure to pack everything tight so there are no free things drifting about.
Eliminate parts: Take off your pedals, derailleur and handlebars, as portrayed previously.
Security: Your bicycle is less ensured in a case so you have to ensure the casing and parts yourself. Use bubble wrap or a comparative defensive material on your forks, handlebars, outline and derailleur.
Affix free parts: Zip-attach your handlebars aside of the fork and your derailleur to the back triangle, ensuring where you're setting them is secured to forestall scouring.
Wheels: If your container is sufficiently large, keep the back wheel on your bicycle and just eliminate your front wheel. It's better for soundness and assurance. Spot the front wheel aside of the edge, with the brake plate towards the edge. Spot defensive cardboard and air pocket wrap between the haggle casing, and ensure it remains on close. Zip-attach the wheel to the edge. (Tip: If your container is excessively little for the bicycle's tallness, give letting the air a shot of the stun to bring down it.)
Tape your bicycle box: A bicycle box is less strong than a pack so you'll need to reinforce its shaky areas. Tape the whole base, just as the corners. Additionally strengthen the territory around the handles with additional tape, as they effectively tear, just as within the container where the front wheel will be set.
Put the bicycle in: By now your bicycle ought to be a one-piece bundle and your bicycle box strongso you should simply lift the bicycle into the container and tape it shut.
Individual subtleties: Write your name and email address on the container, in the event of some unforeseen issue.
6. What would it be advisable for me to think about when pressing the bicycle?
Devices
A keen tip when going with your bicycle is to pack a little device case with it. A little case or pack that doesn't gauge much is great and recall to just convey the apparatuses you truly need to spare weight.
Good tools to have include:
Multitool with Allen and Torx keys
Pedal spanner
Zip-ties and cable cutters
Chain lube and bike grease
Spare mech hanger
Tyre pump and a shock pump
Remember CO2 canisters are not permitted by airlines.
No free things
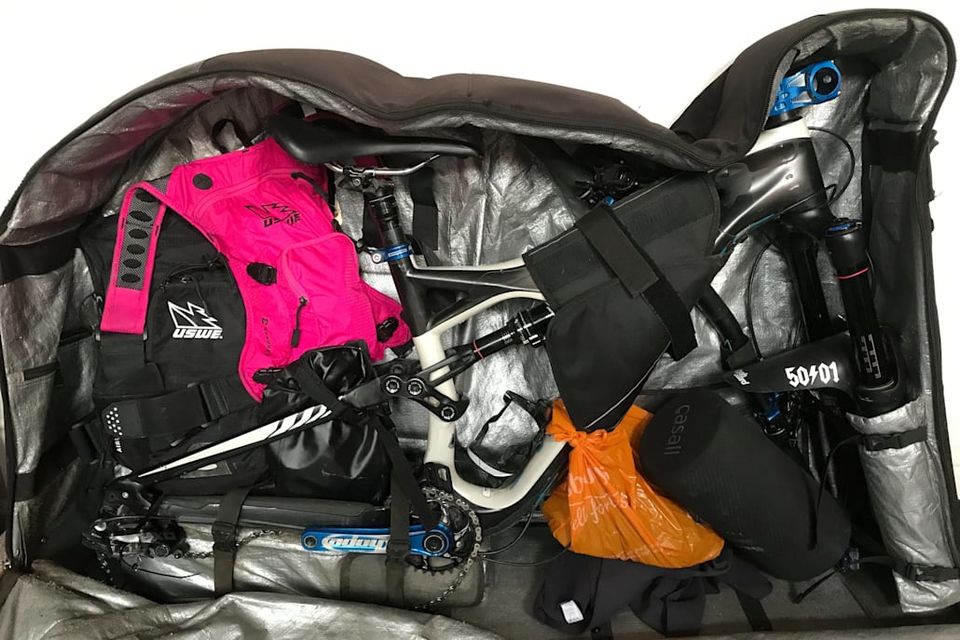
There could be bunches of additional room in the your bicycle pack or box so it's conceivable to stuff different things in also, for example, riding shoes, rucksacks, rollers and devices. It's significant that there are no free things taken care of, however. Everything ought to be tied onto the bicycle or pack.
The bicycle transporter won't generally be standing up; it will really be for the most part on its side or topsy turvy and packed in the middle of different bags and boxes. Any free things will move around taken care of, possibly harming the bicycle, so put the entirety of your little pieces and weaves into sacks or your knapsack and tie it on appropriately.
Helmets are hand gear
It's enticing to place your helmet into the bicycle pack also, yet helmets are fragile and can undoubtedly split, particularly whenever caught between the bicycle and other gear in the hold. You may luck out and endure no harm, however it's not worth the danger – simply accept your helmet with you as hand baggage. Most carriers are absolutely fine with it.
7. What to think about when setting off to the air terminal or station.
Vehicle: If you must be headed to the station or the air terminal, recollect that you'll require a vehicle where the rearward sitting arrangements can be collapsed advances to fit the bicycle sack or box in the boot.
Train: Most trains have devoted regions or compartments for bicycles and huge bags, frequently situated in the front or back of the train. If not, recollect not to impede any crisis exits with your bicycle.
8. What to think about at the air terminal
Once at the air terminal, you've done a large portion of the difficult work. Presently you should simply check in at the work area and afterward drop your bicycle off at the larger than usual gear work area. Prepare sure to have the receipt in the event that you've just paid for the bicycle, as at times carriers request to see it.
Recall that when you get your bicycle from the stuff belt at your last objective, it will in all probability be from an alternate spot to where the ordinary baggage comes out. Search for signs that state 'extraordinary baggage' and head that way.
Good karma and safe ventures.


' fill='%23359391'%3e %3cpath d='M46.1538462%2c43.5714286 L41.5%2c50 L36.8461538%2c43.5714286 L36.8670256%2c43.5714286 C36.3173077%2c42.7142857 36%2c41.6851429 36%2c40.5714286 C36%2c37.4854286 38.4535641%2c35 41.5%2c35 C44.5464359%2c35 47%2c37.4854286 47%2c40.5714286 C47%2c41.6851429 46.6826923%2c42.7142857 46.1329744%2c43.5714286 L46.1538462%2c43.5714286 Z M41.4294872%2c39 C40.6150641%2c39 39.9487179%2c39.675 39.9487179%2c40.5 C39.9487179%2c41.325 40.6150641%2c42 41.4294872%2c42 C42.2439103%2c42 42.9102564%2c41.325 42.9102564%2c40.5 C42.9102564%2c39.675 42.2439103%2c39 41.4294872%2c39 L41.4294872%2c39 Z' id='Location-white'%3e%3c/path%3e %3c/g%3e %3c/svg%3e)