
The traditional winter climbing guides are pretty daunting to most of us with their emphasis on hard, technical climbing. This web site is aimed at people who are looking for challenging winter days but are not ready for or interested in the hardest routes. However, that does not mean that these routes are easy. In fact, many of them are classic mountaineering routes and to complete them safely requires good winter skills and mountain judgment.
Although none of the routes involve difficult climbing (difficulty does not exceed Scottish Winter Grade II), they all require competence using crampons and ice-axe and some of the harder ones require basic climbing and rope work.
Route Selection
The routes have been selected with a number of criteria in mind. They are all in locations that hold snow well and generally involve the ascent of at least one Munro (summit over 3,000 feet).
The difficulty level does not exceed Scottish winter grade II. I have chosen this as the cut-off because it is a grade to which most people can aspire and at which it’s largely possible to 'keep moving' rather than spending hours on cold belays. Inevitably, it does mean that some classic routes are excluded.
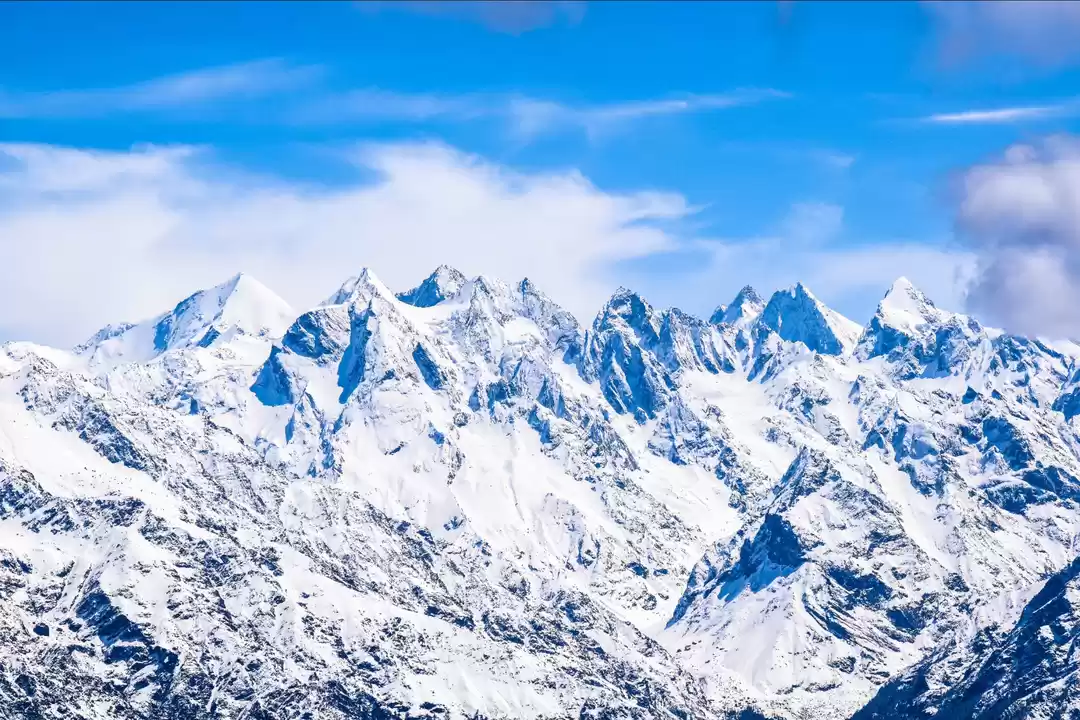
Finally, the selected routes as per Sam's Outdoors.co.uk all have a certain quality. This may be the level of ‘excitement’, the attractiveness of the line or the historical significance and I hope you agree with my assessment. Many of the routes are established classics, some dating back to the earliest days of winter mountaineering, and take you to the heart of the major winter climbing venues - Glencoe, the North Face of Ben Nevis, Lochnagar, the Northern Corries - as well as classic ridge walking country in the Mamores, Glen Shiel and others.
Grading
The grading is based on the tradition UK winter climbing system, which gives routes a Roman numeral, increasing in difficulty from I to X (currently the hardest). Although this system works reasonably well for winter mountaineering, a number of the easier routes are 'ungraded' as they are not classed as climbs. Do not take offence at this! They are still worthwhile and challenging days. I have resisted the temptation to create (yet) another system to cover this situation.
The grades are as follows:
Ungraded - These routes are typically challenging ridge walks without specific difficulties
Winter I - These routes involve climbing easy snow gullies or more difficult ridges, possibly narrow or exposed
Winter II - These routes involve more difficult gullies or ridges with short climbing sections. A rope will definitely be required in places.
The grades assigned to each route are generally the accepted grades taken from the SMC (Scottish Mountaineering Club) winter climbing guide books. However, there area a number of 'scrambles' that are not included in the SMC guides. In this situation, I have worked on the basis that a grade I (summer) scramble roughly equates to a Grade I winter route.
Of course, it is important to understand that conditions can vary enormously depending on the amount and nature of the snow. Icy conditions can make routes difficult as can very powdery or wet snow. Given reasonable snow cover, all the routes here should be feasible but, if the conditions are marginal, good technique and safety precautions become more important than ever.
Timings
The times given are based on average how long each route has taken me (see note) and are adjusted for 'normal' winter conditions. In lean conditions, you can allow less time but under deep snow, allow much more. In reality, many of the routes will not be achievable (let alone safe) if there is a lot of new snow and, under such conditions, you may have to revise your ambitions!
Notes:
Rest times are not included.
It is assumed that gully climbs will be pitched.
It is assumed that ridge routes will be climbed either solo or moving together, with the odd difficult step being pitched or abseiled.
Some are faster than me, some slower but, as I try to keep things consistent so if you are faster than me on one route, you will probably be faster on the next.
Remember, winter days are very short!
Aonach Air Crith Map Photos

The north ridge of Aonach Air Crith, which means 'ridge of trembling', is the highlight of this airy circuit above a spectacular corrie that would not look out of place in the Alps.
Area: Northwest Highlands, Glen Shiel
Grade: Winter I
Total Distance: 9 km
Total Ascent: 1000 m
Time: 5½ hours
Maps: Ordnance Survey Landranger 1:50,000 Sheet 33, Ordnance Survey Explorer 414, Harvey Superwalker Kintail
Avalanche hazard: This is a relatively safe route. Avalanche Forecast area: SAIS do not currently issue a forecast covering this area. The nearest forecast area is Lochaber and the observations are made at Ben Nevis and Aonach Mor, which are around 40 km away. more
Alternatives:
You could ascend Aonach Air Crith via the NE ridge of A’ Chioch, passing just under the craggy ground to ascend on the western side of the ridge. From the summit of Moal Chinn Dearg, you could extend the day by continuing along the South Glen Shiel ridge to Sgurr Coire na Feinne and decending by the Druim Coire Nan Thollaidh.
Starting Point
Park in a lay-by about 3 km west of the Cluanie Inn on the A87 running through Glen Shiel. (Grid Reference NH043114). Walk east along the road for about 400 metres and head over moorland towards the NNW ridge of Aonach Air Crith, crossing a couple of large streams before the ground steepens. Ascend steeping ground which develops into the broad NNW ridge. Higher up, the crest becomes rocky but it is possible to bypass the difficulties on the right hand (W) side.
Eventually, another ridge joins from your left (E) and the main ridge starts to narrow. This part of the ridge is marked Druim Na Ciche on some maps. As the ground gets more technical, it may be necessary to bypass rocky steps on the right but try to regain the crest as soon as is feasible. In particular, there is a section close to the summit of Aonach Air Crith, with steep slabs on the right, where it is best to stick to the crest.
After this section, you reach easy snow slopes which bring you out at the summit cairn of Aonach Air Crith.
Maol Chinn-Dearg
Join the main ridge and proceed west to Maol Chinn-Dearg, the next summit along. From here, descend the NNE ridge, marked as Druim Coire Nan Eirecheanach. The Druim Coire Nan Eirecheanach brings you out on a good path leading back to the car.
Horns of Alligin

A committing mountaineering expedition over the dramatic towers of Ben Alligin, signature features of the Torridon landscape.
Area: Northwest Highlands, Torridon
Grade: Winter I (hard) what does that mean?
Total Distance: 9.5 km
Total Ascent: 1250 m
Time: 6½ hours
Maps: Ordnance Survey Landranger 1:50,000 Sheet 24, Ordnance Survey Explorer 433 1:25,000, Harvey Torridon Map 1:25,000
Avalanche hazard: Reasonably safe apart from the descent into Coire nan Loagh which could be dangerous.
Other routes in the area: The Liathach main ridge traverse is a classic at Winter grade II. The fearsome Black Carls of Beinn Eighe are also Winter grade II.
Start
Reach the village of Torridon via the A896 and take the minor road towards Diabeg. Park in the large car park just beyond the point where this road crosses the Abhainn Coire Mhic Nòbuil, about 2 miles beyond Torridon. Grid Reference NG868576.
Cross the road and follow a good track along the left (E) bank of Abhainn Coire Mhic Nòbuil. After about 1.75 km, cross the river by a bridge and follow the north branch of the track alongside the Allt a Bhealaich. After about 500 m, leave the track, cross the Allt a Bhealaich, and head towards the southeast ridge of Na Rathanan.
Horns of Alligin
Ascend the SSE ridge of Na Rathanan. The terrain is easiest if you ascend slighly leftwards to avoid the steep, craggy ground. Continue until you reach the crest. From here the ridge is more defined and leads you to the summit of the first 'horn'. Continue on the crest of the ridge, scrambling over blocks, to reach the second horn. The descent from this tower is difficult and it is best to descend on the left-hand (W) side to reach the col small at the foot of the third and final horn. Climb the narrow ridge to the third horn. From here descend steeply down the west ridge of Na Rathanan towards a large col leading to Sgorr Mòhr.
Warning One established on the ridge, there are no good ways off it other than completing the route or turning back. In an emergency it would be possible to descend the slopes northwest of Sgurr Mhor but this would necessitate a long walk back to the road.
Sgorr Mhòr (986m)
Beyond the col the ridge rises steeply to the summit of Sgorr Mhòr. From the summit, head west for 100m to avoid the deeply incut gully of Eag Dhuibh then regain the ridge. Continue over a minor top to another col at the foot of the final summit of the day, Tom na Gruagaich.
From the gap about 100 m west of the summit (there is a large cairn here), descend into the wide gully leading into Coire nan Loagh. If the snow is dangerous, it is safer to stay close to or on the rock outcrops.
Return
When you reach open ground at the foot of the corrie, head SSE. Pick up a good path which picks its way through the sandstone outcrops and leads back to the car park.
Forcan ridge Map Photos

The Forcan Ridge of the Saddle is a sensational alpine-style scramble. It is narrow in places and there are a number of tricky moves that cannot be avoided. The length and situation make it justifiably one of the most sought after winter ridge routes in Scotland.
Area: Northwest Highlands, Glen Shiel
Grade: Winter II what does that mean?
Total Distance: 9.5 km
Total Ascent: 1070 m
Time: 7 hours
Maps: Ordnance Survey Landranger 1:50,000 Sheet 33, Ordnance Survey Explorer 414 1:25,000, Harvey Kintail Map 1:25,000
Avalanche hazard: Care needs to be taken on the descent into the corrie below the Saddle, as there have been avalanches here. Otherwise, it's fairly safe.
Gear: Take a 50 m rope, some slings and a few nuts. Take some 'tat' (a sling or loop of rope you don't mind leaving behind) as you may need to abseil.
Start
Park in a layby off the A87, roughly 7 miles west of the Cluanie Inn in Glen Shiel. You will see the stalker's path zig-zagging up a rocky mound on the south side of the glen. Grid Reference NG968143.
Go through a gate and follow the stalker's path which zig-zags at first before bearing right and traversing beneath Meallan Odhar to a bealach, which separates Meallan Odhar from Biod an Fhithich. From here follow the north ridge of Meallan Odhar to its summit.
Forcan Ridge to the Saddle (1010 m)
Follow the broad ridge southwest from Meallan Odhar until you reach the obvious crest of the Forcan ridge. The first step involves negotiating some slabs. If these are icy or covered in fresh snow, you may want to consider deploying the the rope.
Above this, the going is easier until the ridge narrows and climbs to the summit of Sgurr Na Forcan. Take care on the slanting slabs that make up the crest, as the snow is prone to slide away alarmingly.
Continue along the ridge until you reach the obvious ‘bad step’. If the snow is good, this can be avoided by a steep descent to the left otherwise you may need to abseil. Once the step has been negotiated, continue along the ridge, over subsidiary summits until you reach a trig point. This is the summit of the Saddle. Warning Once committed to the ridge, there are no easy escape routes until you reach the Saddle.
Descent
Descend the SSW ridge of the Saddle for about 300 metres (distance) before dropping into the corrie and heading towards Bealach Coire Mhalagain. From the bealach, follow a stone wall which leads you back to the start of the Forcan ridge. From here you could return by the ascent route over the top of Meallan Odhar but it is quicker to take a direct line right (S) of Meallan Ohdar and rejoin the stalker's bath just above the zig-zags (NG961135). Follow the stalker's path back to the car.


' fill='%23359391'%3e %3cpath d='M46.1538462%2c43.5714286 L41.5%2c50 L36.8461538%2c43.5714286 L36.8670256%2c43.5714286 C36.3173077%2c42.7142857 36%2c41.6851429 36%2c40.5714286 C36%2c37.4854286 38.4535641%2c35 41.5%2c35 C44.5464359%2c35 47%2c37.4854286 47%2c40.5714286 C47%2c41.6851429 46.6826923%2c42.7142857 46.1329744%2c43.5714286 L46.1538462%2c43.5714286 Z M41.4294872%2c39 C40.6150641%2c39 39.9487179%2c39.675 39.9487179%2c40.5 C39.9487179%2c41.325 40.6150641%2c42 41.4294872%2c42 C42.2439103%2c42 42.9102564%2c41.325 42.9102564%2c40.5 C42.9102564%2c39.675 42.2439103%2c39 41.4294872%2c39 L41.4294872%2c39 Z' id='Location-white'%3e%3c/path%3e %3c/g%3e %3c/svg%3e)